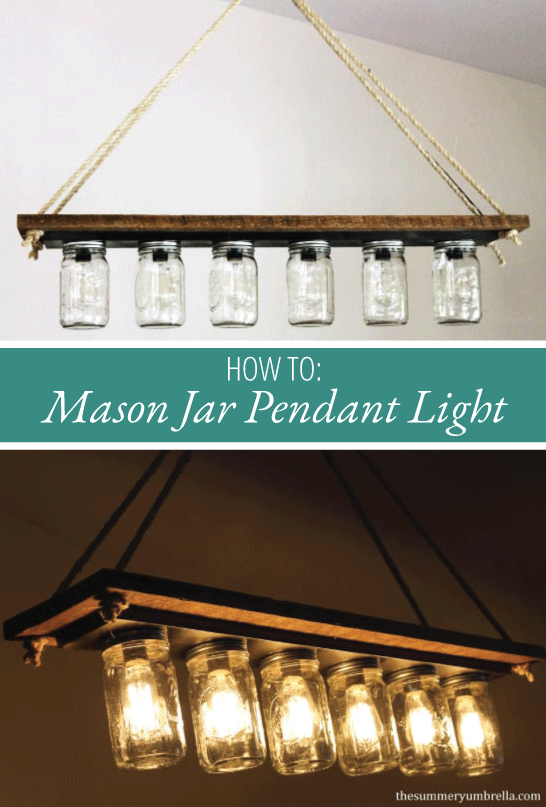
DIY Mason Jar Pendant Light: Upcycle an Old Vanity Light Strip in Easy Steps
Are you looking for an interesting and unique light fixture? Maybe even with a rustic and eclectic twist? Then I definitely think you’ll love this mason jar pendant light!
Upcycle an Old Vanity Light Strip in a Few Easy Steps
These past few weeks at the Cathcart family home have been jammed-packed! It started off with a crazy overload of allergy issues (both humans and pets). Then, we continued onto DIY projects and lots of wonderful orders from our shop The Summery Umbrella.
Mike and I always attempt to work on one room/project at a time, but that never seems to work out. However, it seems to make for a very interesting and extremely creative way of thinking. Kind of like this Mason Jar Pendant Light. It wasn’t exactly on our priority list, but it soon became numero uno!
We started working on our kitchen/dining/living room, but we ran into a snag when our rugs got back-ordered. Then, we had to find the barn wood for our kitchen island and bar.
Plus, I couldn’t decide on seating. Should we do chairs, stools, benches, or even a booth? And then, what to do about lighting?
You see, paint is my best friend. I hate throwing away good items just because of “bad” color. Thankfully I am a bit of a paint hoarder, and I’ve been able to save many items with a simple paint job.
How to Make DIY Mason Jar Lights
With all that being said, I am happy to FINALLY announce that we have finished one of our many lighting projects (plus other “hanging” from the ceiling projects)!
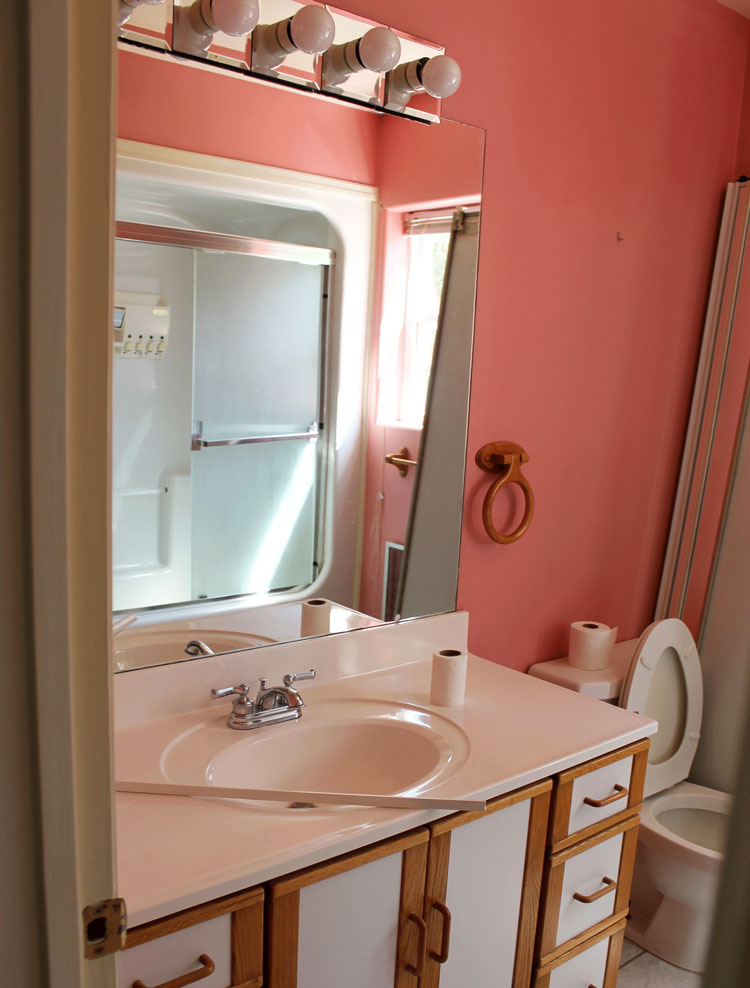
It’s not the best picture, but do you see the mirrored lighting above? Recently Mike and I decided to yank out this vanity, and go figure, this task wasn’t as easy as we had hoped. Needless to say, everything you can see in this picture (except the toilet) is now ripped out.
Thankfully the lighting worked well so a new dining room light was in the making.
And I am going to share with you exactly how we made our new mason jar lights made with wide-mouth mason jars so you can make some too.
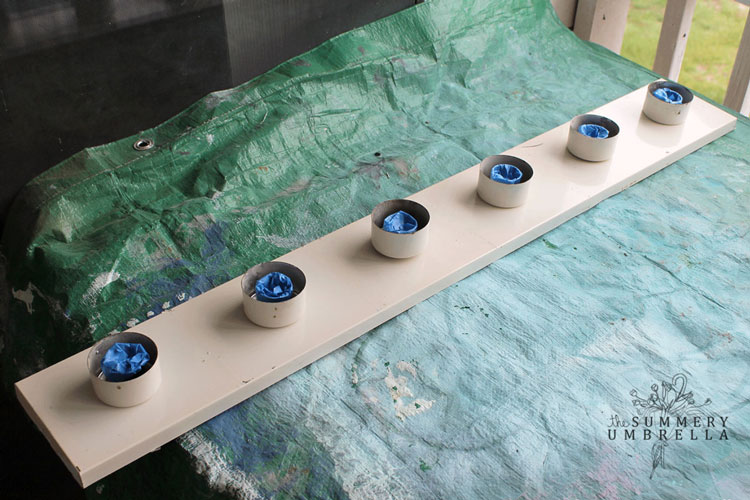
1. Get to the Bare Bones of the Light Fixture
Once the light bulbs and mirrored tiles were pulled off we were left with the bones of this light fixture. They were actually in pretty good shape. It’s very similar to this inexpensive light fixture.
2. Paint the Fixture
So, all I needed to do was tape off the light sockets, wipe off any debris and dust that I saw, and get started on the paint. Naturally, I turned to my all-time favorite spray paint color Rust-Oleum Oil Rubbed Bronze Spray Paint.
I seriously heart this color!
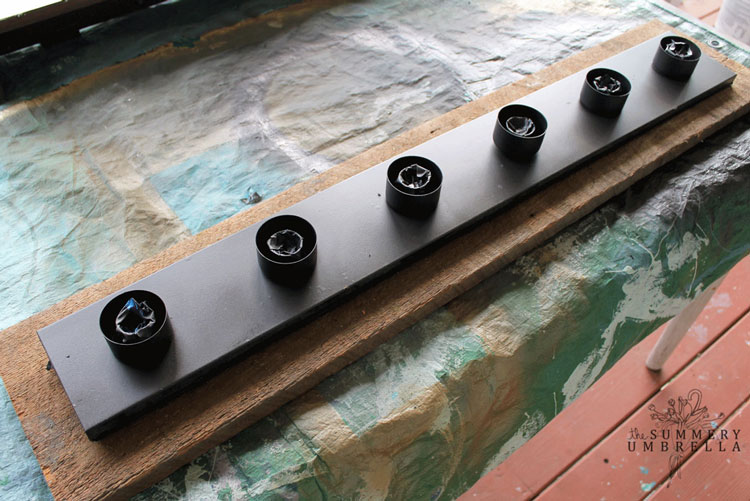
3. Secure the Fixture to the Barn Wood
Then we pulled apart the fixture so it could be secured to our piece of barn wood.
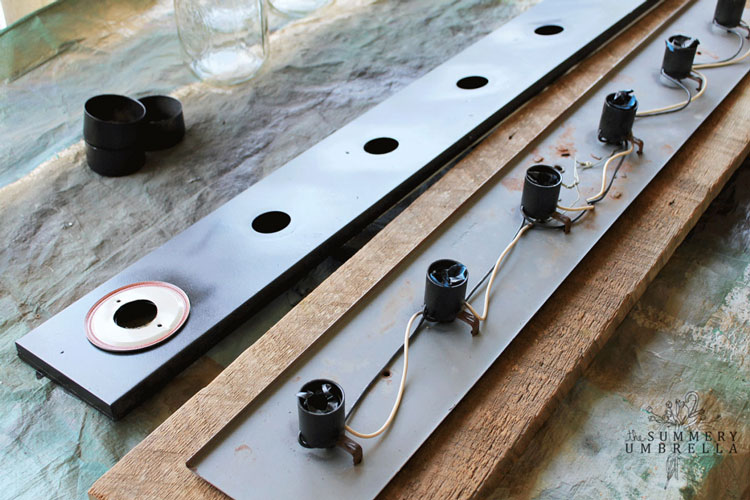
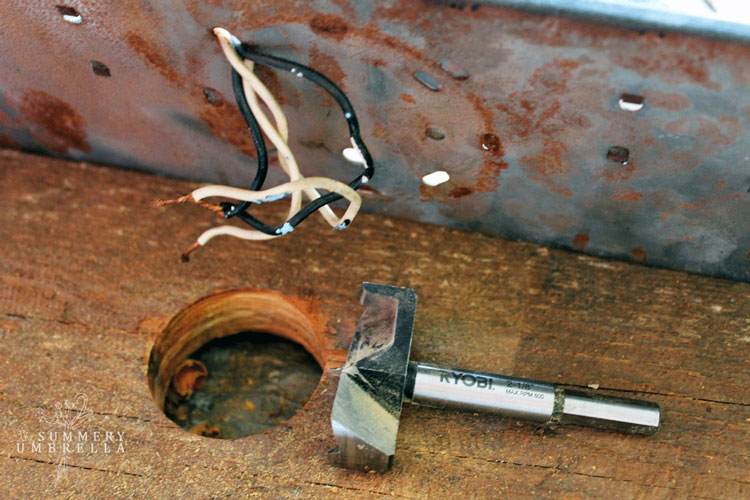
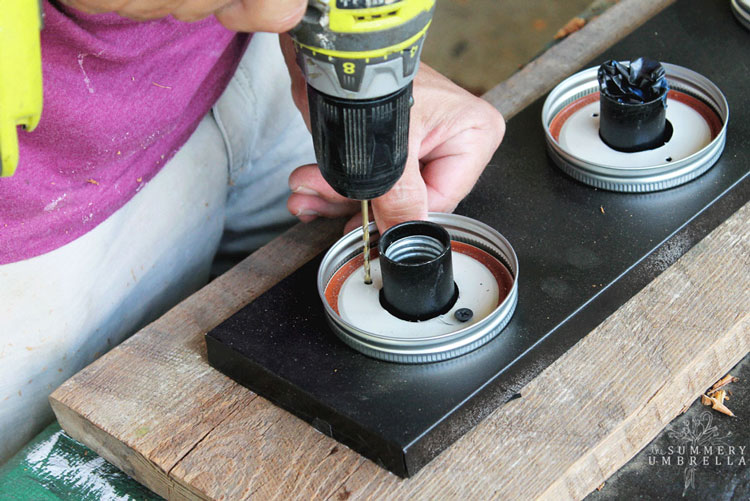
4. Drill Holes Into the Mason Jar Lids
Next, it was time to drill holes into the mason jar lids so they also could be securely fastened to our fixture as well as allow the light sockets to push through.
Oh yea, we can’t forget to add a hole in the wood for the actual electrical to fit through!
More of What You Love: Check Out These Recommended Posts!
- How to Paint Metal Furniture Like a Pro
- How to Paint Furniture with Minimal Prep Work
- How to Paint and Distress Metal Bar Stools Like a Pro
- How to Paint Your Metal Front Door the Easy Way
- 14 DIY Outdoor Furniture Projects to Create this Weekend
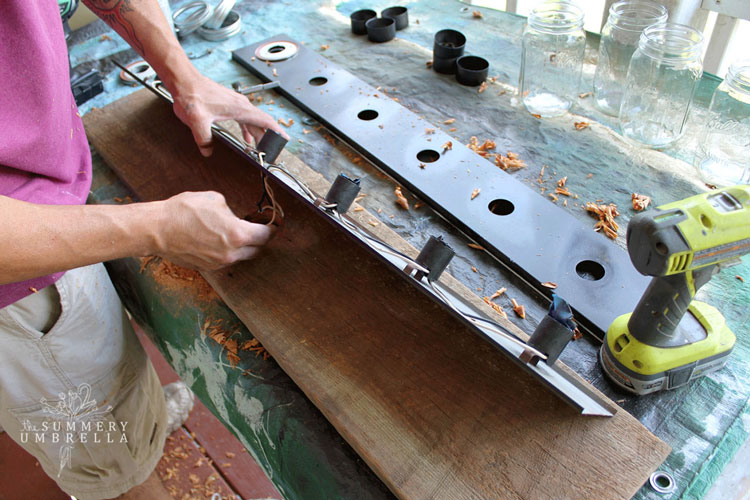
5. Begin to Put It All Together
Ok, so now that we know where everything will be placed now it’s time to put it all together!
Mason jar bands placed on first, check! Lids next, and then screw them in.
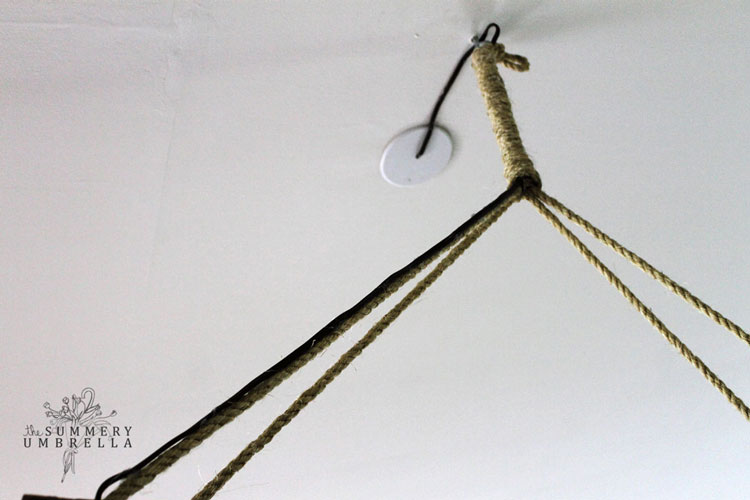
How to Make Mason Jar Lights Look Even On A Slanted Ceiling
I do believe that the only issue we had with installing our mason jar pendant light was determining how to make it look even on a slanted ceiling.
Since we had decided to use a rope to hang up our light and we originally were going to use two ropes. However, it looked a little funny having one side longer than the other so we decided to go with just one.
Mike then installed a ceiling hook with a screw to hang the rope from and being the good wife that I am I allowed him to go ahead and play with the electrical part too. I mean, come on, he likes to play with it! Haha.
I apologize for the super dark photo! We started this project kind of late at night, and I didn’t want to miss out on showing you a few of these steps. This is what our light started off looking like before we tied it up with rope, and then shortened the electrical cord.
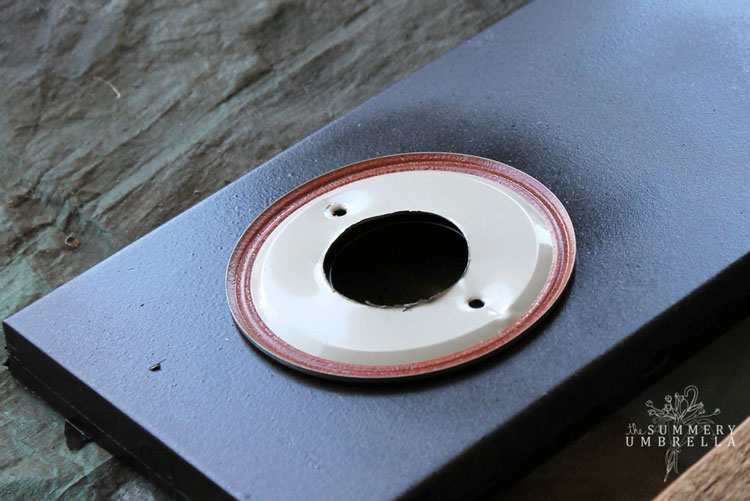
After he trimmed up all of the loose ends we put a plastic electrical cap onto the old hole where the light may have been. We really don’t know!
We ran the electrical cord on the back of the pendant light to avoid being so obvious since we weren’t going to paint it.
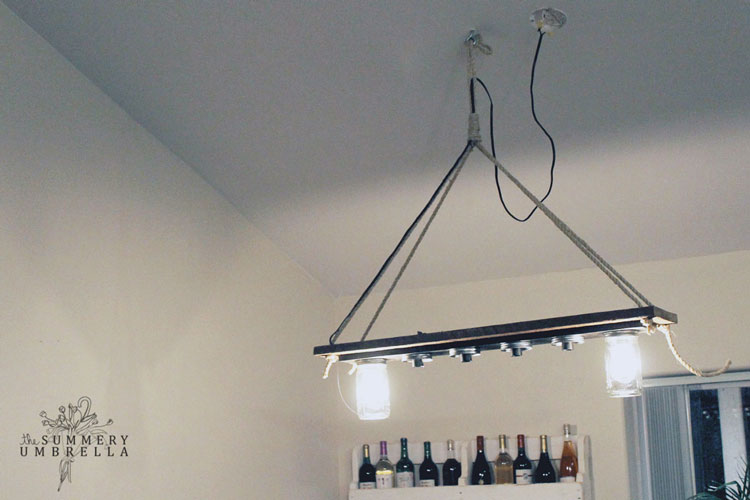
Mason Jar Pendant Light
How gorgeous does it already look!?! We started off using just regular bulbs but felt like there was something missing. So, we invested a few dollars into these old-timey Edison bulbs. Aren’t they drool-worthy? LOVE THEM!
You can find these Bulbrite Edison Squirrel Cage-style Bulb on Amazon for a great price! In fact, it was the lowest we could find among most of the stores we typically frequent.
Even though these bulbs look great without the mason jars we still decided to put them back on. Either way though, they would look amazinggggg!
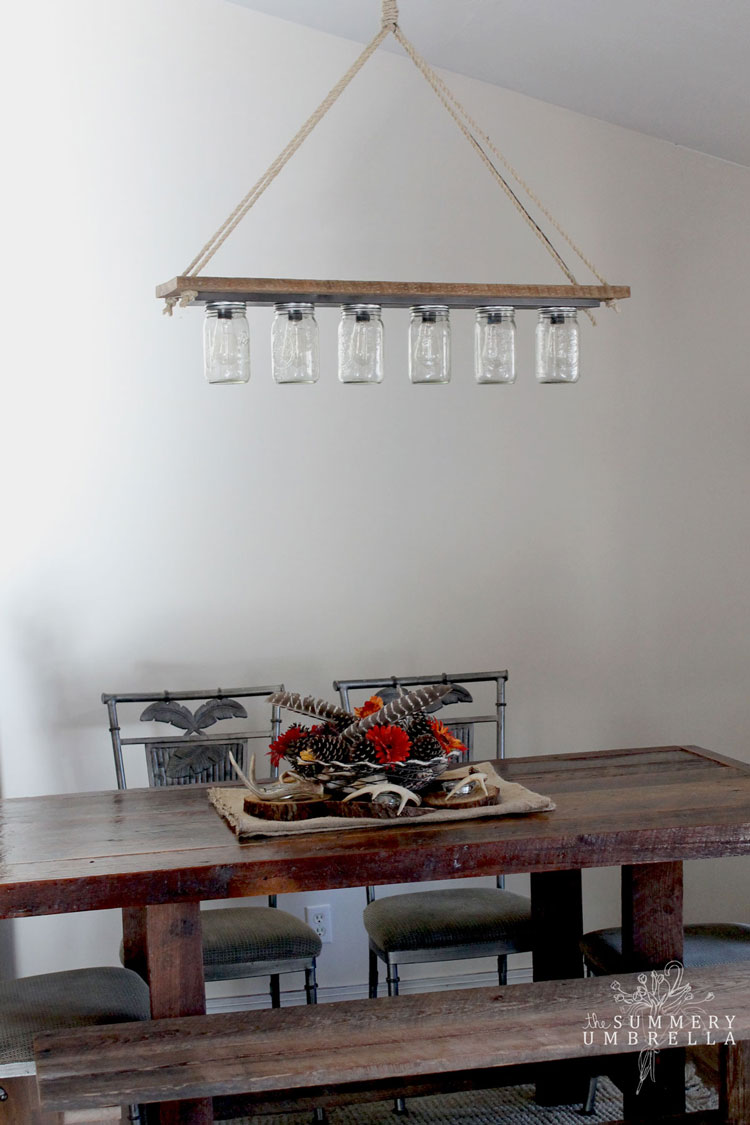
Wowzas! Love our new mason jar pendant light! Another project to add to my book of favorites 🙂
If you loved these ideas then you’ll definitely want to browse some of my other DIY projects that are full of step-by-step tutorials as well as freebies galore! Can’t wait to see you again!

Let’s be Social
UPDATE: I’ve heard through the grapevine that there’ve been a few concerns about exploding mason jars. I just thought I’d stop by and provide a little insight.
Please remember, mason jars are designed for boiling water (aka. canning foods) so the heat that they’re supposed to withstand is at the boiling point. With that being said, the heat from the bulbs will be significantly smaller when compared to boiling water. So, I can ensure you that the risk of these jars exploding is incredibly small. If you have any issues whatsoever with your jars then the company that created them has a huge problem. Also, I’ve had this mason jar pendant light for years, and I’ve honestly had no issues with it. Another option is to use LED Edison bulbs which tend to be a lot cooler than regular bulbs. Thanks again for the sweet comments!! 🙂


Hi Anne! Thank you 🙂
LOVE this! What a fabulous idea. Thanks for sharing!
What a wonderfull idea ! I got a lot of jars in my basment. Now I now what to do. Thank You Liz
No problem, Robert! So happy to help 🙂
I wonder if spaghetti sauce jars would work? I have a bunch that need a use.
Hi Jean! That’s a fantastic question. I “Googled”/researched the topic, and it looks like spaghetti jars are not recommended in place of Mason jars for canning due to them being much thinner and easier to shatter from the pressure and heat. So, in my own personal opinion, I would error on the side of caution and would not use spaghetti jars instead for this project. However, do you know what I like to use spaghetti jars for? Propagating plants! I keep them up high on a few shelves so the plants can do their thing, and then I can also watch their roots come in. Hope this helps 🙂
Would love to have seen it lit up at night. Bet it’s gorgeous.
do you have any issues with heat from those lights? I bet the jars get pretty hot. Did you vent the tops at all? Thanks for the great inspiration!
Hi Jason. Great question! We didn’t vent the tops, and honestly we haven’t had any issues with the jars getting too hot. We use this particular light every day, and it works perfectly 🙂
Love this!! We are considering doing the same! This may be a non-issue, but did you have any trouble getting the fixture to remain parallel to the table and not twist around? Thanks for the tutorial!!
Hi Michelle and thanks for stopping by! I will be completely honest… this is the only thing that I don’t like about this light! I have been able to keep the light parallel to the table for the most part, but every once in awhile it will act a little feisty and will take a little bit of effort to level it out again. However, its never been bad enough for me to want to find a new light. Always a plus 🙂
How were you able to cut the circle holes through the metal covers?
I tried using a wood hole saw…..almost lost a few fingers.
Thanks
Pat
Hi Pat! Great question. We stacked all the lids together and screwed them to a wooden block….(you can see the screw holes already in the lid, which will be used to screw them to our reclaimed wood and vanity strip later) then used a paddle bit and drill. It is definitely a tricky step, and a drill press could also be used. Thanks for stopping in 🙂
what size jar did you use? was it wide or regular mouth?
Hi Ashley! I used wide mouth.
Hi there! We are getting ready to tackle this project and I’m super excited!! What size Mason jar did you use? I know you said they were wide mouth, but there are so many different sizes(ounces).
Your fixture is beautiful!!
Erin 🙂
Hi Erin!! Thank you so much! We used the wide mouth quart-size mason jars. Have fun, and definitely send me a photo when you’re done. I’d love to see it 🙂
Love, Love this idea!!
Thank you, thank you, thank you Gabby! 🙂
Can you post a picture of the bit you used for the hole in the mason jars? I searched paddle. It on amazon and there were many different options. I’ve already ruined one lid with he wrong kind of bit.
Hi Sarah! There are countless brands that you can use, but the bit that you will need will ultimately depend on the size of your light socket. However, we used a 1 3/8 inch Ryobi bit. Hopefully this helps, and thank you again for stopping in 🙂
could this be done as a flush light instead of a hanging
light?
I was so happy to find your site, I am using a mason jar over my ceiling fan light (with the edison bulbs which I LOVE) It was an old cover (granny style) which I could not stand, couldn’t find a replacement until I saw 2 square mason jars in Goodwill – and they fit perfectly. I turned my fan on high for 15 minutes to ensure the vibration would not loosen the jars and the glass was not getting too hot, thrilled that it works!!
Hi Marjorie–I do love those edison bulbs as well! So gorgeous, and gives that old-timey and rustic twist that works so well. I’m so happy to hear that this solution works well for a fan too. Definitely an awesome idea 🙂
This is a very good tip particularly to those new to the blogosphere.
Brief but very accurate info… Many thanks for sharing this one.
A must read post!
Thank you so much! I’m happy to hear that it is helpful 🙂
This is absolutely adorable. I was just one here looking for a way to create vanity lights for my antique mirrored-dresser. I really don’t want to install anything directly to the wood of the mirror, i may decide to paint it later but right now it’s original and in amazing condition, but the typical vanity lights would just look out of place above this. So yes, I’m definitely looking forward to working on this project in the near future.
Thank you so much, Anna! Your antique dresser sounds absolutely gorgeous. I’d love to see a photo when you’re done. It sounds like such a fun project!! Have a good week 🙂
I love this idea but we were considering doing something similar and making them flush mount in our kitchen? Do you foresee any problems doing it this way?
Hi Theresa! That’s a great question. Off the top of my head, the only thing I can think of would be concerning the wires. Maybe instead of doing a flush mount, you could create “sides” and do more of a box. If that’s not a concern then I think you’ll probably just need to ensure the electrical is properly set up. I’d love to see a picture when you’re all done. It sounds amazing!! Best of luck and have a great weekend 🙂
I need a “how to” on tying the rope where the 4 rope intersect and upwards from that point…Thank You, Calvin
Hi Calvin and what a great observation! I’ll definitely put that on my to-do list. Have a wonderful week! 🙂