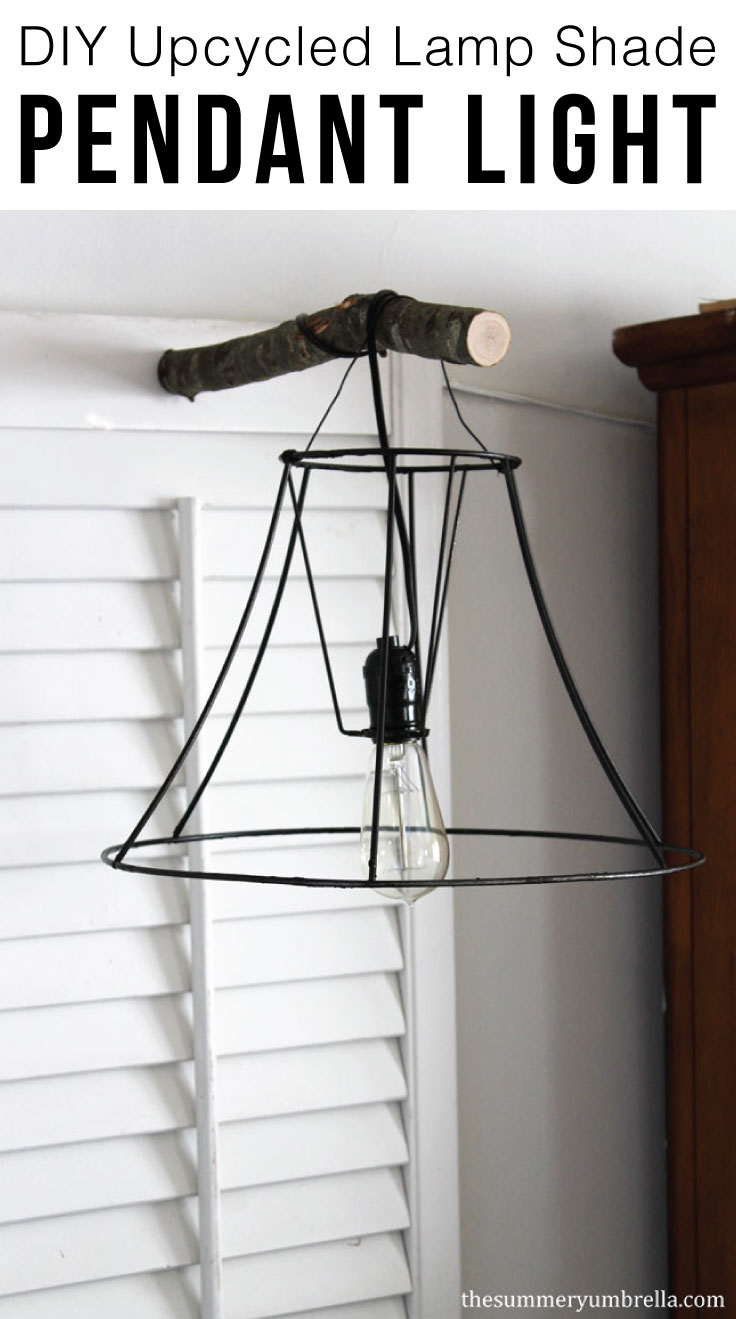
Transform Your Bedroom with DIY Lamp Shade Pendant Lights!
Elevate your bedroom decor with personalized charm – craft Lamp Shade Pendant Lights from scratch. This fun project involves repurposing old lamp shades, adding rustic branches, and creating a dreamy ambiance.

Have you ever had a project that you were dying to create, but just couldn’t figure out how to do it? Well, I feel your pain! I have been wanting to create some sort of upcycled lamp shade pendant light for literally MONTHS. No joke.
I started off thinking that I was going to do huge tree stump floor lights, but since we have carpet (grrrr @my husband) in our bedroom that wasn’t going to work. Then, I thought I’d make light stands on these small benches that we had on hand, but I realized that they would take away from the shutters that I already had up.
So, finally, the idea was to make hanging mason jar lights, but once again I ran into some issues so I ended up just using the electrical bits.
Ready to bring a touch of whimsy to your bedroom? Let’s embark on a journey of crafting custom pendant lights from old lamp shades, turning your bedside into a cozy haven. Here’s how you can illuminate your nights with this fun and playful project.
Materials and Tools
- 2 old lamp shades
- 2 plastic shutters
- 2 small branches
- 4 screws
- spray paint
- 2 mason jar lamp kits
- wire
- cutting pliers
- drill and drill bit

Just to give you an idea of what our bedroom currently looks like here are a few pics:


Step 1: Attach the Branches
I cannot emphasize how important it is to pre-drill your holes! This will make screwing your branch into the shutter a million times easier. Then, secure to the top of your window shutters.
NOTE: These branch pieces are approximately 18″ in length, but this measurement will ultimately depend on how large your lamp shades are.


Step 2: Frame It Up with Plastic Shutters
Take your plastic shutters and position them on your walls. Secure them in place using the screws, ensuring stability.
Step 3: Prepare Your Lamp Shades
Now, I have to be honest, these lamp shades were hell on wheels. It took a lot of cutting and pulling to get all of the fabric off, and still, there were bits that were hot glued on that were being rather feisty!

This next step is by no means required with this project, but if you just so happen to have the same hot glue problem as I did and you just so happen to have a blow torch on hand…

Step 4: Splash of Color
Spray paint the entire ensemble in a color that resonates with your bedroom’s palette. This step not only unifies the elements but also adds a personalized touch to your DIY creation.
Also, depending on if you like the color of your lampshade frame you might be able to skip painting it altogether, but these particular lamp shades were two-toned. Not a fan. So, I once again pulled out my favorite Rust-oleum spray paint color ‘Oil Rubbed Bronze’.
Not only did I spray paint the lampshade frames, but also the lamp kits since they came in a goldish color.

So, this is what the shutters looked like when there were only branches attached to them:

Step 5: Illuminate with Mason Jar Lamp Kits
Time to introduce the mason jar lamp kits. Install them within your lamp shades, allowing the warm glow to cast a dreamy ambiance in your bedroom.
Step 6: Connect and Suspend
Using wire and cutting pliers, connect the mason jar lamp kits and suspend them from the branches. This step brings your pendant lights to life, creating a captivating visual effect.
Step 7: Drill for Details
If needed, use a drill to make any additional openings for the branches and wiring. Precision is key to ensure a seamless and polished look.

TIP: Before you buy any sort of lamp kit make sure you are buying something compatible for your lamp shade frame. I learned this the hard way and had to do a lot of improvising.

Step 8: Let Your Lights Shine:
Admire your handiwork as your DIY lamp shade pendant lights take center stage on your nightstands. The fusion of repurposed elements, nature-inspired accents, and a dash of spray paint has given life to unique and personalized bedroom lighting.
P.S. I did paint the electrical cord from the shutters to my bed. I can still see it, but I think it helps visually. Also, you don’t have to use these Edison bulbs, but… don’t they look so pretty?

They even look fabulous at night!

What is the easiest way to hang shutters on the wall?
If you’re wondering how to attach your shutters to the wall the easiest way I would recommend is with two D-ring hangers. Attach your hangers to the shutter, and then put your screws in the wall for easy attachment. If your shutters are significantly heavy make sure to use drywall hangers with your screws.

Where to Buy Lamp Shades
Don’t have any lamp shades on hand? No worries! I bought these two beauties for a whopping $2 at our local thrift shop.
Looking for more DIY light projects?

Your bedroom is now aglow with the warmth of your creativity. These lamp shade pendant lights not only illuminate your space but also tell a story of repurposing and design ingenuity. So, dim the main lights, switch on your whimsical creations, and let the ambiance carry you into a dreamy night’s sleep. Happy crafting!

Pssttt…. Don’t forget to check out my DIY projects page chocked full of DIY and decorating goodness!


I LOVE this so much!! Very cute and clever…that branch is the perfect touch!
Hi Laurel! Thank you so much for the compliment and stopping by. I’m kind of “geeking” out because I LOVE your page 🙂 Thanks again!
Your light pendants are amazing! I loved the tutorial too, thank you!
Hi Gigi! You are very welcome! I had so much fun making them so this is awesome to hear 🙂
I love these! Crushing on them hard! Thanks for sharing! Also wanted to let you know about a new linky party starting this Saturday at 8pm called “Found & Foraged” Can’t wait to party with you at http://www.houseofhipsters.com
Thank you Kyla! Note to self: Saturday@8pm 🙂 Thanks for stopping by!
You didnt have me till i saw it finished. Love it now. Great artistic vision looks really lovely. Thanks for sharing with us for The Sunday Brunch Magazine. Bel & Eliza xx
Lol. I do believe that’s how most of my projects are! My husband thinks I’m crazy until they are finally accomplished, and then he has a… “Oh, yea. That does look nice.” Thanks for stopping by 🙂
This is adorable. Love the touch of nature. It is stunning as is though if I can offer one tiny suggestion…try camphoring the ends of the branches. I made some birch wall hooks once and found this little detail really helped give them a refined finish.
Hi Kristine! Thank you for the suggestion. I will definitely look into this technique. Always nice to try out new things 🙂