Crafting Cheer: DIY Christmas Trees Sign for a Festive Home
Unleash your inner holiday crafts enthusiast with this delightful DIY Christmas Trees sign that will sprinkle seasonal magic throughout your home. Gather these simple supplies and follow the steps to transform reclaimed wood into a festive masterpiece.
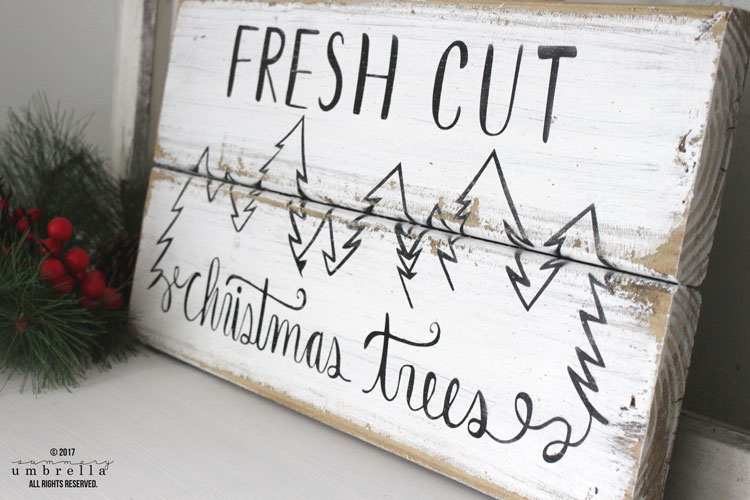
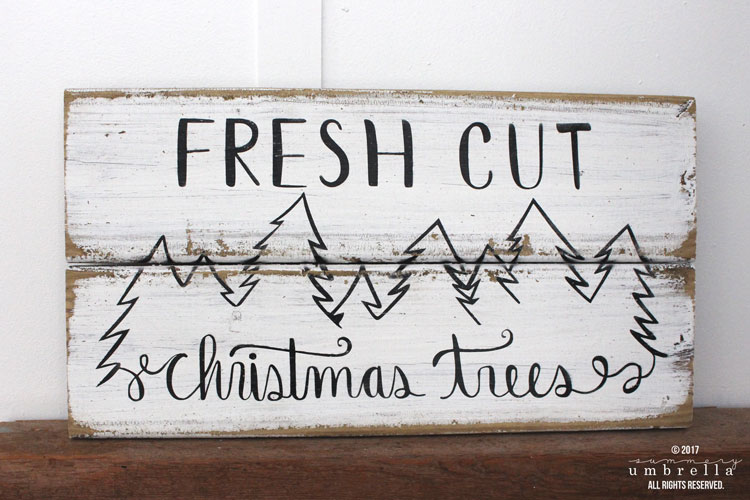
As the holiday season unfolds, what better way to usher in the festive cheer than with a touch of your own creativity? Imagine a rustic Christmas Trees sign adorning your home, crafted from reclaimed wood, radiating the warmth of the season. This delightful project not only decorates your space but also infuses it with the joyous spirit of the holidays.
Beginning: Unwrapping SVG Magic
Before we dive into the crafting journey, here’s a little festive secret – you can get a few “Fresh Cut Christmas Trees” SVG files for free! Yes, you heard it right. By simply signing up for our newsletter below, you unlock a world of creative possibilities. These SVG files will be your key to transforming reclaimed wood into a festive masterpiece that will enchant everyone who beholds it.
Now, let’s embark on this joyful crafting adventure.
I’m merely going to be making them to continue to show you how to create your very own! Still a win-win situation, right!?
For instance, today’s Fresh Cut Christmas Trees Sign design is one of my most popular holiday designs, and I want to share how to make this beauty. So, grab something yummy and warm, and don’t forget to check out the video below either!
Supplies
- 2 – Pieces of Reclaimed Wood (24”L x 6”W each)
- 2 – Wood Pieces (2″W x 8-10″L for back support)
- 1-3/16″ Brad Nails (or finish nails)
- Brad Nail Gun (or hammer)
- White Latex Paint and Paint Brush
- Vinyl
- Transfer Tape
- Squeegee (or a Credit Card)
- Fresh Cut Christmas Trees SVG Cut File (sign up for my newsletter above for the download!)
- Silhouette CAMEO and Mat
- Black Spray Paint (or Airbrush and Lacquer Paint)
- Sander
- Rust-Oleum Mat Top Coat Spray Paint
Let the Magic Begin: Crafting Your Christmas Trees Sign
- Begin by cleaning off your boards with a sander or stiff brush if needed.
- Line up your two boards on a flat surface, ensuring they sit evenly next to each other.
- Take the two back support pieces and place them evenly away from each other on the backside. Nail them into place securely.
- Flip your sign over and paint it white. Don’t worry about achieving perfection since you’ll be distressing it later. Allow the paint to dry for a minimum of 5 hours.
Crafting Christmas Spirit: Adding the Fresh Cut Christmas Trees
- Use your Silhouette CAMEO to cut out the Fresh Cut Christmas Trees SVG Cut File with vinyl on your mat. Remove the vinyl from the mat and apply your transfer tape.
- Remove the backing from your vinyl and carefully take out the vinyl pieces of your design that you will be painting.
- Apply the vinyl to your sign board, ensuring even alignment. Use a squeegee to firmly push it down.
- Slowly remove your transfer tape, leaving only the vinyl on your board.
- In a well-ventilated area, evenly apply a light coat of spray paint (or use your airbrush) to your vinyl. Allow it to dry and then apply additional coats until your desired color is achieved.
- Once the paint is completely dry, remove your vinyl. If you encounter difficulty pulling up small pieces, a weeder tool can be handy.
- Lightly distress the edges and all over the entire sign with your sander to give it a charming aged look.

More of What You Love: Check Out These Recommended Posts!
- Deck the Halls DIY Style: 25 Rustic Christmas Decor Ideas to Inspire
- Cozy & Charming: Craft Your Rustic Christmas Table Decor Magic!
- Snowy Splendor: Crafty Winter Centerpieces to Warm Your Heart
- Amazingly Natural and Rustic Christmas Table Idea
- Bargain Bliss: Seasonal Decor That Won’t Break the Bank
- Festive Fusion: Mastering the Art of Year Round Holiday Decor
Sealing the Magic: A Top Coat for Your Christmas Trees Sign
No masterpiece is complete without the finishing touch. Seal the magic with a top coat spray, adding protection and longevity to your festive creation. This step ensures your Christmas Trees sign will be a cherished part of your holiday decor for years to come.
A Seasonal Masterpiece: Hanging Your Christmas Trees Sign
Complete your DIY journey by adding hangers to your Christmas Trees sign, turning it into a display of festive art. As you gaze upon your handcrafted masterpiece, revel in the joy of the season that you’ve brought to life with your creativity.
Need help making your own signs? Visit these tutorials too!
- Silhouette CAMEO Video Tutorial
- Make Your Own Fairy Tale Reclaimed Wood Signs
- Ultimate Guide to Making Your Own Signs
As you hang your Christmas Trees sign, let it be a testament to the joy of creating something magical with your own hands. The holiday season is not just about decor; it’s about infusing your space with the warmth of festive cheer.
Psst! Want to keep the festive magic flowing? Hop over to my Seasonal Holiday Decor Projects page for a year-round celebration of creativity! From spooky Halloween hacks to merry Christmas miracles, and everything in between – it’s your one-stop shop for holiday inspiration that won’t break the bank.
And remember, the enchantment doesn’t end here. By signing up for our newsletter, you’ve unlocked a trove of creative treasures in our resource library. Cheers to a season filled with crafting, joy, and the magic of a festive home!