Craft Your Own Fun: DIY Drawstring Pencil Bag Adventure!
Craft a DIY drawstring pencil bag with old jeans! Organize your supplies in style. A crafting adventure for a functional masterpiece.

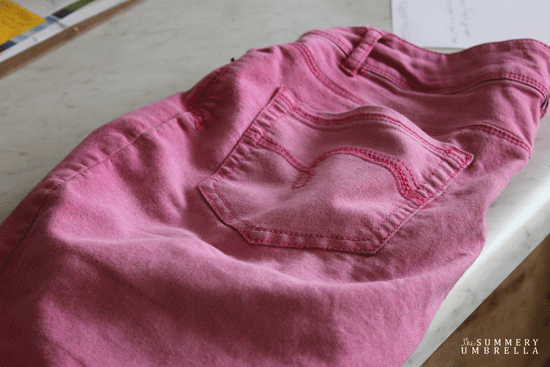
I’m so thrilled to share my latest obsession – the DIY drawstring pencil bag! Picture this: I’m gearing up for a family vacation, and the realization hits me – I need a perfect bag for my pens, pencils, and Ava’s crayons. No store-bought solution, of course. So, here comes the crafting superhero in me, ready to transform a pair of old pink jeans into a nifty drawstring bag.
Let’s Dive into the Crafty World of DIY Drawstring Pencil Bags
First things first, I laid out my pens, pencils, markers, and Ava’s crayons on a pair of pink jeans. A quick snip with my trusty scissors, and I had the fabric ready. No rocket science, just DIY magic at play.

Now, the sewing adventure begins. Full disclosure – I’m not a sewing wizard, just a passionate DIY enthusiast. With a sewing machine, I closed up the pants leg, nothing fancy, just pure functional crafting.
A Splash of Creativity – Adding the Drawstring
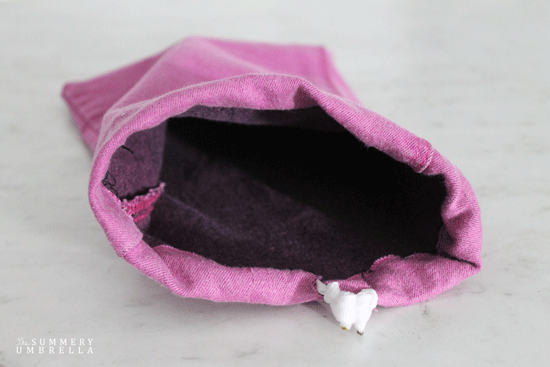
Decision time! Inside or outside for the drawstring? It’s your call! I opted to turn the cuff inwards for that neat and chic look. Bonus – it camouflaged a few sewing mishaps. The DIY path is all about embracing imperfections with style.
Crafty Holes and Ribbons – Where the Magic Happens
Next, two tiny holes for my white ribbon, and it’s ready for some cinching action. I threaded the ribbon, pulled it halfway through, and voila – restriction capabilities were achieved. A bit tricky, but hey, crafting is an adventure, right?


Inside Out, Upside Down – Finishing Touches
Flip the bag inside out, fold over the edges, and cover that ribbon. A few straight pins secure the folded fabric, and with careful stitching, the drawstring area gets its final touch. Mind the edges; you wouldn’t want to accidentally seal your masterpiece shut!

Knots and Singed Ends – Seal the Deal
Last leg of our crafting journey – knot the ends of your chosen drawstring. My white ribbon got a good four or five knots, and a gentle singe secured them together. A final flip, and there it is – your DIY drawstring pencil bag, ready to dazzle!
More of What You Love: Check Out These Recommended Posts!
- DIY Curtains in No Time: The Iron-On Tape Trick You Will Love
- DIY Pillowcase Laundry Bag: The Easy Way to Keep Your Laundry in Check
- How to Create an Embroidery Pattern Using an Image

Why You’ll Love Your DIY Drawstring Pencil Bag
Believe me; this bag is a game-changer. Not only does it snugly fit all my supplies, but it’s also Ava-approved for her little creative essentials. The best part? It slips right into your purse, making it a crafting companion on the go.

Crafting Happiness, One Bag at a Time
So, here’s to Fridays filled with creativity and the pure joy of DIYing. Grab those old jeans, dive into the crafting zone, and let the magic of DIY drawstring pencil bags add a touch of fun to your day!
Happy Crafting!


Aaaahhhhhh! I love this tutorial because it’s clear, easy, and it involves many of my obsessions—pouches, storage, organization, upcycling! I have so many pouches, and IMNSO, you can’t have too many! I can’t wait to try this! Thanks!
Thank you so much, Mel!! I can’t wait to hear all about your upcycling adventure 🙂