Mastering Heat Transfer Vinyl: The Ultimate Guide for Stunning Custom Designs
Learn how to add a little spice to your next project with Silhouette Heat Transfer Vinyl! PLUS, in this tutorial, I’m giving away a flower cut file. Win-win!

Happy Monday, everybody! Ok, let me get this out of the way. First, this is a massive post! I’m going to be showing you How to Use Silhouette Heat Transfer Vinyl PLUS it includes a Free Flower Cut File that was hand-drawn by yours truly. Woo-woo!
In my experiences with heat transfer vinyl, it can be a little tricky so I will be providing you with a WHOLE bunch of tips and tricks which will obviously make this tutorial super helpful, but also kind of intense.
Sign up below to get access to this freebie plus my entire resource library!
However, you know me. I’m going to keep this simple, and get to the point as quickly as possible so you can get started on your own project!
Let’s get started!
This post is sponsored by Silhouette. However, I will still be providing my amazing readers with opinions that are 100% my own, and based on my personal experience using their AWESOME products.

Learn How to Master Heat Transfer Vinyl
SUPPLIES
This is what you will need before you get started.
- Large Flower SVG Cut File (sign up above for this freebie!)
- Silhouette CAMEO and Mat
- Heat Transfer Vinyl
- Fabric of Choice (I’m using little girl’s shorts)
- Pillowcase
- Iron
Instructions
This is how to use heat-transfer vinyl on your Silhouette Cameo.
- Open up Silhouette Studio.
- On their Welcome screen or from the File drop-down at the top, you will select “Open”
- Select the design file you would like to cut out.
- Once your file is placed onto your blank page you will need to click on the “Open the Trace Window” button in the top right-hand corner. It looks like a blue and yellow square with an aqua butterfly within it.

Trace Your Image
- For this next step, you will be tracing your image so it will be recognized by Silhouette with its own cut lines. Click on the “Select Trace Area” button and create a large box around your design. Essentially you will be clicking and then dragging the box to create a square.
- Under the Trace Method section on your right sidebar click the “Trace” button.
- Click on your design again and drag your image to the right. You should see your original design, and then also a red outline (the cut version) of it as well. Delete the original.
- For this particular flower design, it looks nice oriented to the left or right, but if you plan on using the text you will definitely need to mirror the image prior to cutting it out. You can do this in two different ways.
- 1) You can right-click on your design and click “Flip Horizontally”
- 2) Click on the “Open the Replicate Window” tab/icon and click either “Mirror Right” or “Mirror Left”.
- Then, measure your fabric and make sure your design is the correct dimensions for your desired end result.

- Click on the “Design Page Settings” icon/tab on the top right corner of your screen.
- On this tab, you’ll find the ability to change your page dimensions (width and height), rotating views, mat size, and also options to turn on print and cut borders.

Silhouette CAMEO Instructions
- Then, send it to your CAMEO machine to be cut. In the upper left-hand side of the page you’ll see an “A” on a small design that looks like your machine. Click this.
- On the right-hand side of your page your “Send to Silhouette” icon/tab will open. Click on the button at the bottom that is labeled Advanced Settings.
- In this tab, you can change your Cut Mode, Cut Style, and Material. My recommended settings for each are: Cut Mode -Standard, Cut Style – Cut, Material Type – Heat Transfer Material
- Now, as for the blade setting… this can be a little tricky. I was using an old blade and the recommended blade setting for my machine was set at 2. This didn’t cut my design at all for me. So, I upped it to three and four… still nothing. NOTE: Don’t be like me and forget to use the “Test Cut” option after wasting valuable pieces of heat transfer vinyl. Ugh.
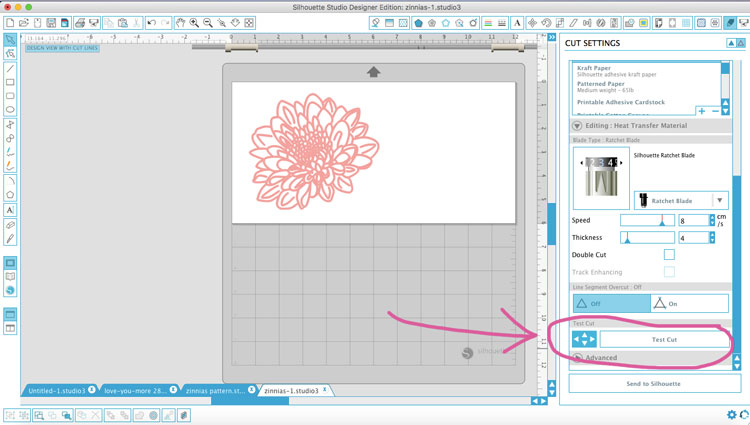
Test Your Settings
- ALWAYS, always, alwayssss use your “Test Cut” option while you’re figuring out what setting your blade needs. I ended up putting in a new blade and then using a setting of 3 to work for this particular project.
- After you’ve figured out what settings will work for your heat transfer vinyl you’ll click on the “Send to Silhouette” tab to actually cut out your design.
- NOTE: I always use my mat when I’m cutting my designs out. Personal preference I suppose, but I swear by it. It always turns out better for me.
- NOTE: Don’t forget to put the GLOSSY side DOWN. The glossy side is your transfer tape so when you are pulling your design out of your vinyl you do not want to cut through this side.

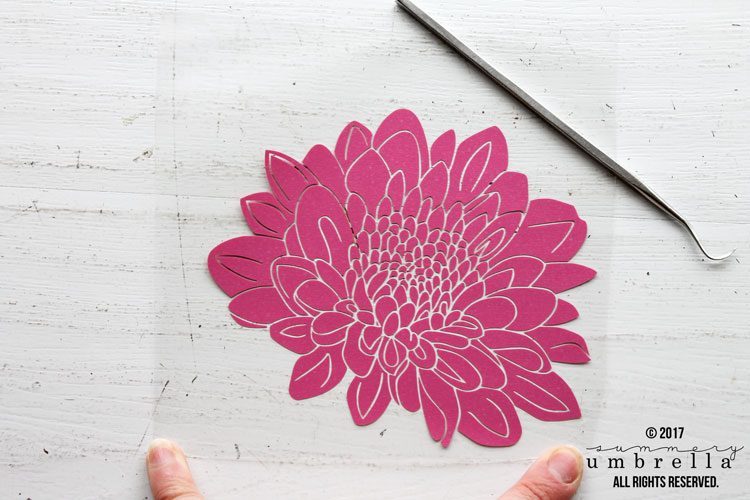
Weed Out the Pieces
- After you’ve cut out your design weed/pull out all the pieces that you will not be using and do not want on your fabric. Basically, as you can see in the below picture, your design will be left on your clear backing (acting as transfer tape) so it will make it super easy for you to flip over and iron it on.
- Next, flip your design over so your heat transfer vinyl design is on your fabric in your desired location.
How to Use Silhouette Heat Transfer Vinyl PLUS Free Flower Cut File
- Last, put your pillowcase (or a thin piece of fabric over your heat transfer vinyl) and iron it on.
- I set my iron to the highest setting and moved it back and forth on my design using heavy pressure for about a minute.
- Remove your iron and pillowcase and gently try pulling up your clear backing. If your heat transfer vinyl does not stick to your fabric you’ll need to iron it for a little longer.
- When it is sticking to your fabric go ahead and slowly pull off your clear backing.
- Then, if you’d like, repeat the same process with a smaller version of this design in a different color.
NOTE: Need more in-depth instructions on how to do the above steps? Check out this blog post for a video tutorial!
TIP: While you can use a variety of files to import an image into Silhouette Studio I highly recommend purchasing their Designer Edition upgrade so you can import SVG files (they are typically included when you purchase custom hand-drawn vector files), and come out with cleaner edges and are more user-friendly for cutting purposes. However, you can also import the following as well without the Designer Edition: STUDIO, DXF, PNG, JPEG, PDF, GIF, BMP, and TIFF.


How to Use Silhouette Heat Transfer Vinyl PLUS Free Flower Cut File
Not too bad, right? It takes a minute or two to get the right setting for your blade, but other than that it’s smooth sailing from there!
Next week, I’ll be sharing ANOTHER heat transfer vinyl project with a free cut file. So, stop by soon, take care, and see you soon 🙂
If you loved this project then you’ll definitely want to browse some of my other SVG Projects that are full of step-by-step tutorials as well as freebies galore! Can’t wait to see you again, and Happy Crafting!

Psstt… don’t forget to download this free SVG file by signing up for my resource library above!
Let’s be Social
This post was updated in March 2023.


This is awesome.. I always heat transfered on vinyl on T-shirts.. Shorts never strike my mind.. Now I’m going to add one more item to my business..
Hi Edward–Can’t hurt to try, right?! My daughter still loves her pair. 🙂
great idea!!thanks for sharing. this is really helpful.I haven’t tried heat transfered on vinyl on shorts. I will add one more item to my collection.
Thank you, Kelli! I hope it turns out great 🙂
“It was really insightful.
Thanks for the info.
Wanna have more contents from you.
Cheers””
Thank you! So glad you liked it 🙂