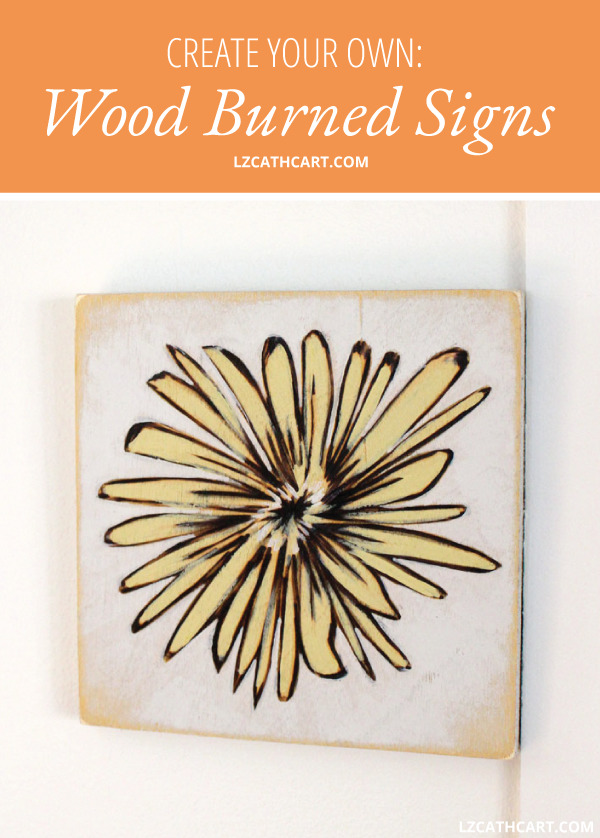
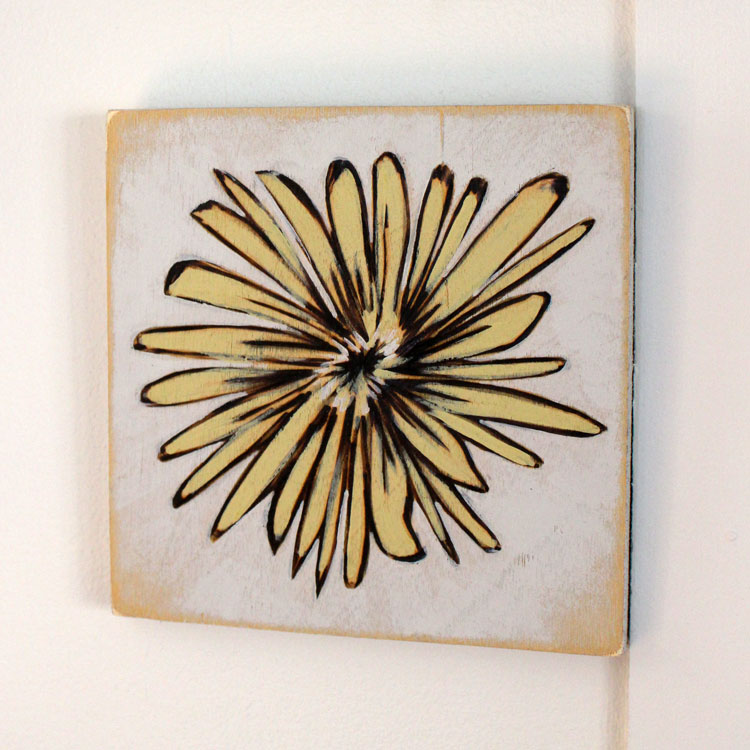
The Charm of Wood Burned Signs: Elevate Your Home Decor
Have you ever wanted to make your very own wood burned signs, but are not sure where to start? Join me today as I show you the basics, and how to use a stencil to make the process super quick!
Do you know what I love about signs? There are literally hundredssss (maybe thousands… I should do the math for this one day) of ways they can be created. I’m not just talking about designs, but how to accomplish them as well.
Isn’t that amazing? Seriously, it’s pretty mind-blowing to think of the various ways you can make an eye-catching wood sign for your decorating needs. Plus, a lot of them can be accomplished with just a few items!
For instance, today I’m going to be showing you how to use … wait for it… a wood-burning tool kit!
Are you hesitant about using one? Don’t worry. I was too! I’ve never been known for exactly being the most graceful, and I typically like to have a layout before trying something of this magnitude. I mean, come on, I don’t want to burn down the house! 😉
Want freebies? Join below for access to my resource library!
With that being said, I’ve put together this super easy, wood burned sign tutorial for you! Even if you’re not into flowers, the basics of how to make these types of signs will still be the same and can be replicated time after time.
So, let’s get started!
How to Make Your Very Own Wood Burned Signs
Materials
- Vinyl (this is my favorite brand!!)
- Transfer Tape
- Squeegee (a sturdy credit card will work great too)
- Cutting Machine (Silhouette or Cricut — your choice!)
- 6″ x 6″ Cabinet Grade Plywood
- Wood Burning Kit (the one I use)
- Marker (a medium gray works well for this project)
Steps
1. Firstly, download the template at the link below.

2. Use your Silhouette CAMEO (or your preferred cutting machine!) and cut out the Sunflower SVG Template with the vinyl on your mat.
3. Once your design has been cut out from your vinyl remove it from your mat and apply your transfer tape.
During this step, your squeegee comes in very handy. Use it to smooth out any air bubbles your transfer tape might get when you add it to your vinyl.

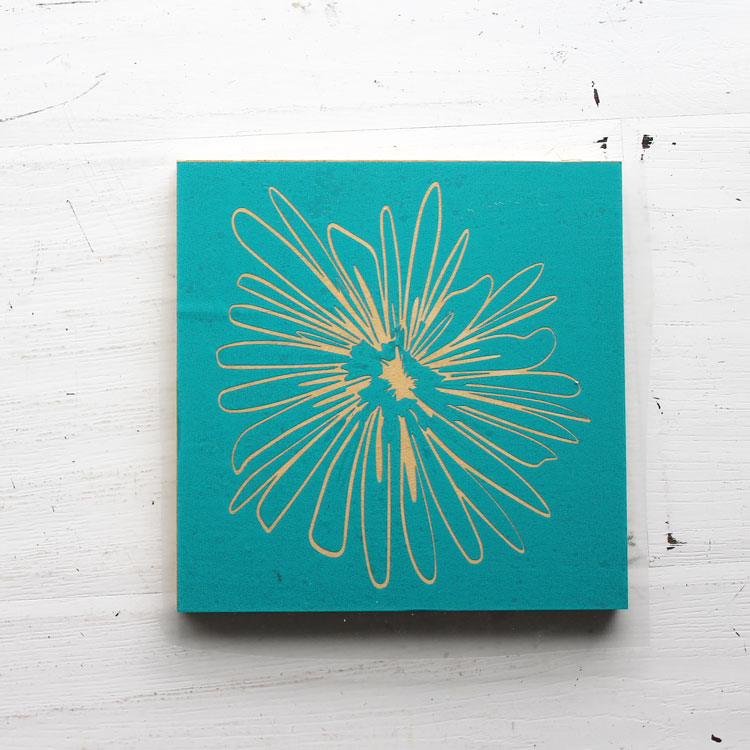
4. Now, remove the backing from your vinyl, and carefully take out the vinyl pieces of your design that you will be burning.
After you have removed all of your vinyl pieces it is now time to apply it to your signboard. Basically, line up your vinyl with your board so it will be applied evenly, and using your squeegee firmly push it down.
How to Make Your Very Own Wood Burned Signs
5. Slowly remove your transfer tape so that only your vinyl is left on your board, color in the design with a marker, and then remove your vinyl.

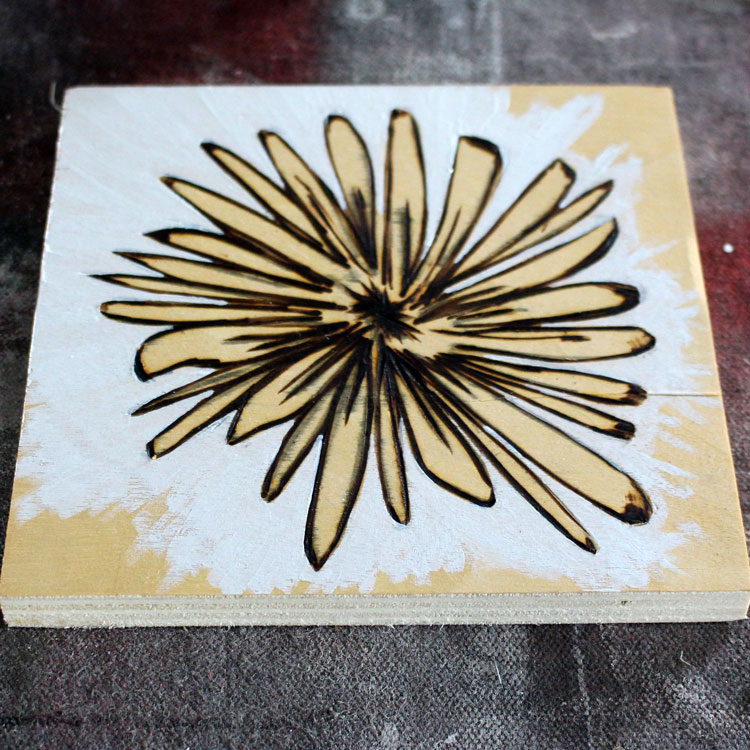
6. After that, get out your wood-burning tool. If this is your first time using a wood-burning tool make sure to start with a softwood (like cedar or pine). They burn a little easier than hardwood, and will make the process less frustrating.
Feel free to practice on a piece of scrap wood that you have laying around before trying it on your sign.
7. Start wood burning. Slowly work your way around your board burning the marks you made with your marker.
8. Once you’re done burning you can leave it as is, or paint around it as I did with a little bit of paint.
In conclusion, distress the edges with your sander, add hangers to the back or even use it propped up on your favorite shelf.
And that’s all there is to it! Can’t you just see all of the possibilities with this tool? You can make wood burned signs for just about anything.
For example, you could use them on wood canisters, boxes, tables, bowls, branches, etc.
If you loved this project then you’ll definitely want to browse some of my other Wood Signs that are full of step-by-step tutorials as well as freebies galore!
Can’t wait to see you again, and Happy Crafting!

Pssttt… don’t forget to download the file before you go!
Let’s be Social
- Instagram @thesummeryumbrella
- Facebook @thesummeryumbrella
- Pinterest summeryumbrella
- YouTube @thesummeryumbrella
This post was updated in April 2023.